12/31/10

Happy Holidays from Hunger Habit

You can see that we've been roasting meats this holiday season. The two below are some of my favorite celebratory roasts and we'll definitely be needing a detox after filling up on such juicy and delicious dinners over the last few weeks.

This is the first year I've abandoned the traditional English turkey. Don't tell the in-laws, but turkey comes last on my list of roasted meats, so I was happy to see it behind us after Thanksgiving.

The first roast is the uber-famous Zuni Cafe Roast Chicken with Bread Salad. I'm not the first person to blog about this dish and I certainly won't be the last. I've professed my love for it after visiting Zuni Cafe in November. I was immediately taken under Judy Roger's spell, as all good food lovers who have pre-ordered her chicken should be.

The chicken is salted at least 24 hours in advance and you need to pat it dry during several occasions after it's sat in the refrigerator. It's a delicious roast chicken, but the bread salad is something very remarkable. The currants, scallions, toasted pine nuts and crispy bread are all bathed in a sharp vinaigrette and married together by sitting in your oven while your chicken rests. If you haven't been to Zuni, get there. If you want a new way to roast chicken, try this. Immediately.

The recipe on the link above is just as it is in her cookbook. I didn't adapt it at all. Some things should not be messed with.


The second triumph was my sister's (okay, Martha's) Christmas Roast Pork with Crackling. After abandoning the traditional roast beef, we settled on pork, but it needed to be BIG. She proceeded to order the pork leg from her local butcher and she and my Dad wrestled with this huge beast to ordain it with three heads of garlic. If you need pork to feed a crowd, this should be your choice. You certainly need some muscles to man handle this in and out of the oven. You've been warned.

You can see that the crackling turned a perfect golden brown and we crunched it greedily. The pork was juicy and spiked with the garlic pearls, thanks to my Dad's hard work. When paired with my black truffle dauphinoise and some simple green beans, the Christmas feast was memorable.

So here I am, staring 2011 in the face and a meatless weekend ahead. It's been worth it.

Happy New Year from Hunger Habit. Peace!

11/28/10

Pay the price

For my English Mother in-law, Lesley's, first Thanksgiving, we rolled out the pumpkin pie carpet. The turkey was roasted to perfection, but not without normal amounts of stress surrounding timing and oven schedules. Ultimately, the low point of the day came when I shook hot pan drippings with flour and exploded the burning liquid all over Lesley - her hair, her shirt, her glasses. It was a poor attempt at de-lumping the gravy and at least three of us in close proximity to the disaster paid the price.

After a quick trip to the bathroom for clean-up, the laundry room for stain remover, offers of a stiff drink and many apologies, we were back on track.

These little sprouts were proudly displayed on the menu as an attempt to add a British stamp to our Thanksgiving parade. Our normal green vegetable, green beans, were supposedly out of sight. Lesley is a top-notch peeler and quickly offered to peel and halve SIX bags of sprouts. All I did to thank her was nearly send her to the ER.

I had pre-tested the sprouts several weeks ago because we can't get enough of them at my house. I even like them thinly sliced, raw, served with some vinaigrette and a little parmesan. For this Thanksgiving dish, I roasted the sprouts rather than boiling them into submission, and they came out caramelized and crunchy. Pancetta was mostly responsible for their deliciousness, but I'll take a little credit.

You can enjoy these sprouts tossed with a little pasta for a quick mid-week meal. Add a little glass of red wine and it could even make it to the weekend.

Roasted Brussel Sprouts with Pancetta, Capers and Parmesan
Serves 2

1/2 lb brussel sprouts
6 oz pancetta, cubed
1 clove of garlic, minced
1 shallot, finely chopped
one sprig of thyme, leaves removed
3 tbsp capers
1/2 cup parmesan cheese, grated
olive oil
a little squeeze of lemon juice
salt and pepper
handful of chopped parsley

Preheat the oven to 400F. Prepare the sprouts by cutting off the bottom of each sprout and peel off any yellowed outer leaves. Halve them and then toss them in a little olive oil, salt and pepper. Pour them onto a baking tray in one layer and roast for about 15-20 minutes until they are starting to brown. Turn regularly.

In the meantime, get a pan hot on your stove and add the pancetta. Brown it until it's getting crispy, but not completely done. Add the thyme and shallots and stir until translucent. Add the garlic and stir around for a few seconds until fragrant. Finally add a squeeze of the lemon juice and scrape the pan to get all of the juices off the bottom.

Take off the heat and add the capers.

Take your sprouts out of the oven, toss them in your pan and put them back on the baking tray. Make sure to get all the yummy juices out of the pan and onto the sprouts. Roast for another 10 minutes until the sprouts are golden and crunchy on the edges.

Sprinkle with parsley and parmesan and serve as a side dish or toss with pasta for a main dish.

Check your seasoning at the end and add a little more lemon juice if needed.

10/28/10

Talk about a rut

It's been too long. Excuses seem sour and uncalled for, but I haven't written for a month. I could blame work. I barely think of anything else. I could blame travel to sexy places like Detroit and Cleveland that don't exactly leave time for fresh cooking or thinking.

I could blame weekends away from home, a preference for flopping on the sofa with a glass of wine and a lazy call to our neighbors, Terragusto for fresh, hot pasta. One minute, I'm making gin cocktails with loads of inspiration and the next, I've made the same veggie tacos 5 times in the matter of four weeks. Talk about a rut.

The thing is, these veggie tacos are so damn good, so easy and so quickly satisfying, that I go into a robotic state when I find myself at the market. My mind seems to stop functioning past queso fresco and lovely light corn tortillas. I've found my shoulders sagging if my favorite rainbow swiss chard is unavailable and I have to settle for spinach.

Here's another confession: I've also been trying to eat less or no meat during the week. Carnivores, don't get all upset. I've recently been inspired to try Nigella's roasted pork knuckles, so I've not completely fallen off the meat wagon. That said, these swiss chard tacos fit the bill and pack so much flavor into a tiny taco, you won't miss the meat.

Rick Bayless, Chicago's hero with a passion for Mexican food, is responsible for my current veggie taco obsession. I have read his book, Mexican Everyday, from cover to cover because let's be honest, I could eat Mexican EVERYDAY.

I like to whip up the smoky salsa over the weekend and use it with these tacos and on everything else I eat. It usually lasts us until Thursday. I've made these for my family, my husband (who I'm sure is sick of eating them), and I've promised countless friends and colleagues this recipe over the past month. No more excuses.

Get your tomatillos on the grill and get ready for a veggie Mexican feast. You can't call it a rut when they are this yummy.

Swiss Chard Tacos with Caramelized Onion, Fresh Cheese and Red Chile
Adapted from Mexican Everyday by Rick Bayless
Serves 4

12 oz bunch of swiss chard (rainbow chard is my favorite) or spinach
1 1/2 tbsp vegetable oil
1 large red onion, sliced 1/4 inch thick
3 garlic cloves, peeled and finely chopped
1 tsp red pepper flakes
1/2 cup chicken or vegetable broth
salt
12 warm corn tortillas, store bought
1 cup Mexican queso fresco or other fresh cheese like feta or goat cheese
3/4 cup smoky chipotle salsa
For the salsa:
Makes 1 1/4 cups

3 garlic cloves, peeled
4 medium tomatillos, husked, rinsed and cut in half
2 canned chipotle chiles en adobo (or more if you like it spicy!)
salt

First, make the salsa:
Set a large nonstick skillet over medium high heat. If you don't have non-stick, lay in a piece of foil. I like to do this on my griddle pan to get some nice charred lines and flavor on the tomatillos and garlic.

Lay the garlic and tomatillos (cut side down) on the hot pan and brown the tomatillos (3-4 minutes) and then turn them over and do the same on the other side. The tomatillos should be completely soft.

Scoop the garlic and tomatillos in a blender or food processor and add the chipotle chiles with 1/4 cup of water. Process to a coarse puree and put it aside to cool. Taste and season with salt- about 1/2 tsp.

To make the tacos:
Cut the chard crosswise into 1/2 inch slices. If using spinach, you can leave whole. In a very large skillet, heat the oil over medium high heat. Add the onion and cook, stirring frequently until golden brown but still crunchy- about 4-5 minutes. Add the garlic and red pepper flakes and stir around for a few seconds until aromatic. Add the broth, 1/2 tsp salt and the greens. Reduce the heat to medium low and cover the pan. Cook until the greens are almost tender. This will take about 5 minutes for swiss chard or 2 minutes for spinach. You can try any types of greens in this recipe...just remember: the thicker the stalks, the longer it will take to cook.

Uncover the pan and raise the heat to medium high again. Cook, stirring continually, until the mix is nearly dry. Taste and season with a little extra salt if necessary.

Warm tortillas ( in the microwave, dribble 3 tbsp over a clean kitchen towel or paper towel and wrap your tortillas in them. Put in a non-plastic bowl with a lid and microwave for about 1-2 minutes. Be careful when removing because of the hot steam.)

Serve with warm tortillas, crumbled cheese, salsa and plenty of napkins for messy hands.

9/25/10

Rock it

Last night, we definitely had "the Friday feeling", as my husband likes to call it. You know the feeling. It's been a long week. If we all worked on Mad Men, we'd still be in the office smoking cigarettes, pouring ourselves a single malt scotch from the corner mini-bar, and getting up to mischief.

Instead, most of us innocently rock through the front door after a hard-worked week and collapse on the sofa. Martin and I had grand plans of making a home-made pizza, cracking open a bottle of 2007 El Nido Clio and unwinding. (If you can get your hands on a silky bottle of Clio, don't hesitate.)

I knew we had to start the unwinding right, so I quickly produced all of the ingredients for my new favorite cocktail, The Roquette. Before you read any further and start to ask, "salad....in a cocktail??", let me stop you.

For those of you who know me, you'll know I'm partial to a little gin from time to time. Straight up Tanqueray, shaken until cold as the north pole with plenty of olives is a favorite tipple of mine. It only takes one. That said, it took me no time at all to be a Hendricks gin convert, and this cocktail has been known to tempt even those who don't like gin. I call these people crazy. Hendricks is infused with cucumber and rose petals and this is a twist on a classic cocktail, the Gimlet.

I imagine this to be a cocktail drunk by gentlemen in stripey socks, such as these below.

Unfortunately, these are my husband's socks, worn specially for his sister's recent wedding. Englishmen love outrageous socks for some reason, and although you can take the English lad out of England, you can never take away his love of stripey socks. The one thing a move to America will do to an English boy, is give him a new found appreciation for ice.

No longer will one cube suffice in his whiskey and ginger cocktail. I witnessed first hand as Martin received a cocktail with one ice cube floating lonely at the top of warm whiskey and ginger ale. He simply grabbed the barman's tub of ice and began filling the glass with a disgusted look upon his face. America has spoiled him.

The salad leaf element in "The Roquette" comes from peppery arugula, also known as rocket in England and roquette in France. When combined with lime juice, Hendricks, and a little dark agave nectar for sweetness, this cocktail is the perfect prescription any American, Brit or Frenchman with "that friday feeling."

The Roquette
Makes 1 cocktail

1 cup of loosely packed baby arugula (or rocket if you're in London or roquette if you're in Paris) plus a little extra for garnish
4 1/2 tsp fresh lime juice
1/2 cup Hendricks Gin
plenty of ice
a rocks glass for serving

Muddle the arugula, agave nectar and lime juice in a cocktail shaker. Use a pestle or bash the leaves down with a wooden spoon. Add the gin and ice and shake. Pour over ice in a rocks glass ( a short tumbler) and serve with a few arugula leaves as garnish.

9/19/10

English road trip

Two weeks ago, we returned from a trip to England where we drove 1000 miles across the length and breadth of the country visiting friends and family. The ultimate reason for our journey was to attend my sister in-law's wedding in Devon, our last and southern most destination.

England's weather initially answered our worst fears as we donned coats and scarves and reminded ourselves it was August. Happily, the sun shone on Helen and Anthony's special day. We sipped champagne in the stone courtyard of Loyton Lodge, toasting their love and lack of umbrellas.


There were several food and drink highlights along the winding English roads, many from our hospitable hosts:
I chose to share the recipe for the parmesan egg custards for several reasons. We had it for a starter over lunch with our friends, Toby and Rachel, and we ended up making it again that night with fresh eggs from their neighbor's chickens.

Twice in one day. That's how good it was. You can see that eggs laid in a nest that morning are a spectacular golden yellow. They tasted so rich and creamy and gave the custard a glorious color.

I also include it because we gleaned the recipe from the chef, Richard Stokes, who quickly handed it over in scratched writing with no trepidation. I am quite sure that I would have guarded this simple recipe selfishly. When we tasted it, I was sure I sensed some truffle oil, but the chef's recipe did not mention it. Maybe he was more clever than I thought.

We tried the recipe without the truffle oil, but it sadly fell flat. We added a little powdered English mustard which gave it a kick, but truffle oil wins hands down. You can serve it with soldiers (sliced toast) or asparagus for an elegant starter. Remember that the custard will require regular tasting towards the end to make sure you have enough seasoning and truffle oil. As always, I like a recipe with a chef's sweet treat, and this one is definitely at the top of my list.


Parmesan Egg Custards
Adapted from Richard Stokes at The Three Horseshoes

1 pint of fresh cream
100 g parmesan cheese, grated
4 egg yolks
truffle oil
salt and freshly ground pepper to season
small funnel (if you're serving them in the empty egg shells)

In a pan, heat the cream on a medium-low flame until hot but not boiling. Remove it from the heat and let it sit for a minute or two.

Meanwhile crack four eggs with a metal spoon so that just the top comes off. You don't have to serve this in the empty egg shells, but I like the effect. If you're going to go for it, just practice on a few eggs before you get started, but they don't have to be perfect.

After you've cracked the top off of the eggs, pour the egg into your hand over the sink and let the whites slip through your fingers, leaving just the yolks. Be careful not to crack the yolk in your hands and drop them into a mixing bowl.

Reserve your egg shells, and rinse with hot water. Carefully leave them to dry upside down on a paper towel.

Mix the yolks together with the parmesan cheese and season lightly with salt and pepper. Using your whisk, pour the cream into the egg mixture, just stirring with your whisk to combine. Add the entire mixture back into the pan over a medium-low heat.

At this point, you'll need to continually stir the mix until it starts thickening, becoming like a normal custard and covering the back of a wooden spoon. Add several drops of truffle oil and taste. I added about 8-10 drops of truffle oil, just enough for it to be a back ground taste, but enough so that I knew you'd be able to taste it. Season with salt and pepper to your taste and remove from heat when it's thick and creamy.

Use a small funnel to serve in the reserved egg shells. Grate some extra parmesan over the top. Dip sliced toast or blanched asparagus and enjoy!

8/21/10

Not so innocent

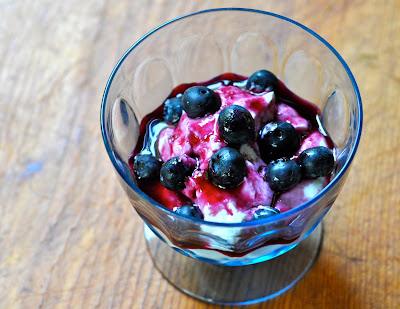
After recently buying 3 pounds of blueberries, I spent a few hours at the stove staining every surface and several wooden spoons with home-made blueberry syrup. Inspired by a recent Food & Wine article, I was looking for something to top my greek yogurt for a quick but delicious breakfast.

Don't be fooled into thinking that this blueberry syrup is as innocent as it looks. It can easily be transferred from yogurt to pancakes, or as a finger-licking ribs marinade.

If you're like me, I'm beginning to feel like autumn isn't quite as far away as I thought it was. While it's still sticky-hot here in Chicago, I'm finding myself requesting a table outdoors even when the air conditioning beckons. I know that in a few short months, I'll be chilled to the bone and dreaming of sipping sweat beaded ice-cold drinks on the patio. This is a great way of capturing summer-sweet blueberries and enjoying them long into the autumn.

You may recognize the bottle I used from the spiced vodka I gave away as gifts over the holidays. This too would make a perfect gift and will last for months if stored in the refrigerator and sealed tightly.


Home-made Blueberry Syrup

5 cups (about 1 1/2 lbs) of fresh blueberries
2 cups of sugar
4 cups of water
6 one inch strips of lemon zest removed with a vegetable peeler
3 tbsp fresh lemon juice

In a pot, combine the blueberries with 1 cup of the water. Mash the berries with a potato masher and simmer for 15 minutes. Remove from the heat and strain the juice through a sieve into a heat-proof measuring cup, pressing hard on the solids. This will take a little muscle work and patience- you want to squeeze as much juice from the berries as possible. Discard the solids.

Rinse the pot out and combine the rest of the 3 cups of water, sugar, and lemon zest. Bring to a boil and stir continuously until the sugar dissolves. Boil the syrup over moderate heat until it measures 225F on a candy thermometer, or about 20 minutes.

Add the blueberry and lemon juices to the syrup, bring to a boil for 1 minute, then remove from the heat. Let it cool, then discard the lemon zest.

Pour into just-cleaned bottles and seal tightly. Store in the refrigerator for up to 6 months.

8/8/10

Get low

Photo taken by Stacia Marselos
I've been wanting to make this low country boil for several summers and now I know what I was missing. This particular recipe comes from a family friend, Paul Campbell. As far as I'm aware, he made it whilst visiting our place in Northern Michigan several summers back and it's been talked about with a great deal of longing in family food conversations. In general, a seafood boil is popular in many coastal states in the United States, particularly in Louisiana and South Carolina. Maryland and New England have their own versions of seafood boils, but this low country boil is just that- from the low country.

First things first. Your shellfish of choice is crucial. Get it fresh and don't compromise. We used the freshest shrimp and mussels, we could lay our land-locked hands on, but craw fish would be great if you're lucky enough to be in Louisiana. Secondly, it doesn't hurt to get the sweetest sweet corn. At last! Something we mid-westerners can score quite easily!

Lastly, the seasoned broth that your stew cooks in can be tweaked to your tasting (some people add hot sauce, lemon, parsley), but start with a crab boil seasoning packet widely available in US supermarkets. For my friends outside the borders, try this mix, but either way, beware: this is potent stuff! Four of us were hovering over the brew and couldn't stop sneezing. No joke!

Before you embark on making a low country boil, remember a few final tips:
  1. This is simple stuff and it's very easy to make, but you need a very large pot- at least 10 gallons.
  2. I urge you to assign a "Boil Master" who will be in charge of ensuring ingredients are added in the proper sequence and that the water comes to the boil between each addition. Do not make the mistake of giving this job to two people. Arguments can break out. You've been warned.
Typically, this dish is poured out over newspaper on a picnic table where a crowd dives in with juices dribbling down chins. If you want to be a bit more civilized, don't forget the amazing broth at the bottom of the pan. It should be ladled generously over everything and mopped up with crusty bread and a crisp green salad.

Low Country Boil
Adapted from Paul Campbell
Served 6-8

4 stalks of celery, chopped roughly
2 onions, roughly chopped
1 crab boil seasoning bag (or make your own)
3 gallons of water
1 4-5 small red potatoes, scrubbed and cut in half
6 ears of corn, snapped in half
2 lb shrimp, peeled, de-veined and tail left on
1 1/2 lb mussels
3 lb sausages cut into bite size pieces- we used hot Italian and mild Italian
3 tbsp kosher salt
plenty of freshly cracked pepper

Quick tip for mussels: ask your fishmonger to keep them on ice for you. When you get them home, dump them in a colander and rinse while you de-beard them- pulling the little grassy/beardy bits from each shell. Discard any mussels that are already open. If they are open slightly, tap them on the counter. If they don't close shut, discard them.

Add the water to the pot, add the salt, pepper, crab boil seasoning bag, celery and onion. Bring to the boil and simmer briskly for 10-15 minutes.

Add the potatoes and cook for 5 minutes. Add the sausages and cook for a further 10 minutes and then add the corn. Bring it back to a boil and cook for a further 5 minutes. Add your shrimp and mussels and put the lid on. Boil for a further 5 minutes and discard any mussels that have not opened during cooking.

Your low country boil is now ready for serving. Pour it over newspaper or ladle it onto a big serving platter. If you're a corn lover like me, you'll want to cook all your corn in the crab boil seasoning from now on!

7/19/10

Keeping my cool


I'm getting ready for a weekend in New York for my birthday, and in the mean time, I'm trying to keep my cool. I'm the kind of gal that doesn't mind sweating if that's what I intended to do. Chicago has turned up the heat and we're having the best summer since we moved back to the US. Our thermometer hit 100 degrees this weekend, just as we finished a meltingly hot round of golf Saturday afternoon. We've made the most of the weather by seeking shade during the day and heading outdoors just as the early evening kicks in.

Lately, evenings in our neighborhood have been filled with people piled on their front porches, a slow stroll with the dog, and a nice cold drink underneath a cloudless sky. The thought of eating when the sun is still glaring is all but impossible, but here are a few of my favorite treats for sweltering summer evenings:
Last, but not least, is a chilled summer soup that is so shockingly pink, you may well think you should be sitting next to Barbie at the dinner table. Chilled summer borscht, is a cold beet soup. It is an old Lithuanian or Russian recipe, popular in Eastern Europe. If you like beets, this soup is for you. It's a perfect start to a meal, so serve it in small cups to brighten your guests palates and cool them right down.

You can make this soup with a clear broth, like this one from the NY Times or Martha's, but I prefer it when it has the yogurt incorporated into the soup. Ina Garten's is the best I've ever made. It's a cool and creamy combination of cooked fresh beets, cucumber and dill. I love watching the pink soup develop its color in the fridge. I prefer to let it sit overnight so that it turns a deeper shade. You can peek at it every so often and give it a stir and watch the beets work their magic.

Summer Borscht
Adapted from Barefoot Contessa At Home by Ina Garten
Serves 6

5 medium fresh beets, tops trimmed
kosher salt
2 cups chicken stock, homemade if possible
16 oz sour cream, plus extra for serving
1/2 plain yogurt
1/4 cup sugar
2 tbsp freshly squeezed lemon juice
2 tsp champagne vinegar
1 1/2 tsp freshly ground black pepper
2 cups medium-diced English cucumber, seeds removed
1/2 cup chopped green onions
2 tbsp chopped fresh dill, plus more for serving

Place beets in a large pot of boiling, salted water and cook for 30-40 minutes until tender. Remove the beets with a slotted spoon and let cool. Strain the beet liquid through a fine sieve and reserve.

In a large bowl, whisk together 1 1/2 cups of beet cooking liquid, chicken stock, sour cream, yogurt, sugar, lemon juice, vinegar, 1 tbsp salt, and freshly ground pepper. Peel the cooled beets (use gloves unless you want pink fingers) with a knife or rub them off with your hands.

Cut the beets into a small to medium dice and add them, the cucumber, scallions and dill to the soup. Cover with plastic wrap and chill overnight (minimum 4 hours).

Season to taste and serve cold with a dollop of sour cream, a few chopped scallions and some dill.

7/11/10

Napping before dinner


I've only just come to the conclusion that the 4th of July is my favorite holiday of the year. Unlike Christmas or Thanksgiving, Independence Day adds the all important ingredient of sunshine to a food-filled holiday. Just as we intended, we spent our long weekend in Michigan with very little on the agenda. I spent some well earned cash at Symons General Store's cheese counter as a crate of Piper's Pyramid was being delivered and could not be denied. Highlights included a sunset boat cruise with my Aunts and Uncles on Walloon Lake, a very hot bike ride, and a romantic glass of pink bubbly with my hubby that left us both napping on the back deck before dinner.

That said, I had very little energy left for cooking, but knew a Tomato Pie was on the cards. I'm usually depressed by the tasteless tomatoes found in the supermarket, and even though we're not on the height of tomato season when you can easily find yourself with a surplus of red fruits, this is a great way to kick of the summer tomato season. I was able to get some great tomatoes from Bill's Farm Market and couldn't wait to get this pie in the oven.

This recipe comes from my Mom's friend, Linda Priddy, whose genius recipes have been mentioned previously, and this is definitely one of my favorites to date. Jen, her daughter in-law, sent me this recipe, and I've been anxiously awaiting the summer to give it a try. It's a tomato pie and it's extremely quiche-esque, but I'd prefer to keep the name pie attached to it. It's perfect for breakfast, lunch or dinner, and I ended up making four of them to take to my Aunt and Uncles as a contribution to our over night spent with them. You can make your own pastry, or you cheat and use frozen pie shells from the supermarket. Either way, I can guarantee this pie will be part of your summer must-have meals for the months ahead.


Tomato Pie
Adapted from Linda Priddy

9 inch pie shell:
(make your own and pre-bake or pre-bake a frozen shell according to instructions)
3 large tomatoes, peeled cored and sliced thick (blanch quickly in boiling water to peel easily)
3 tbsp fresh basil, chopped
2 eggs, beaten
2 cloves of garlic, minced
2 tbsp real mayonnaise
3 tbsp chopped green onions
1-2 cups shredded sharp cheddar and gruyere cheese
salt and freshly cracked pepper

Preheat the oven to 375F. Fill pie shell with layers of tomatoes and green onions, seasoning the tomatoes well in between the layers. Combine the basil, eggs, garlic and mayonnaise and pour over the layers. Top everything with the cheeses and bake for about 35 minutes until lightly browned.

Serve with a herb salad, shaved carrots and topped with a honey-mustard vinaigrette.

6/29/10

Glass of wine and a sunset


I'm headed to Michigan this weekend for our annual 4th of July escape. Last year, we made a feast for a family reunion, and if something on a larger scale is on your agenda, I suggest you check out some of the recipes from that previous post. This year, our schedule is a lot less hectic, and although we'll be getting together with family while we're up there, I'm keenly interested in making some low-key foods that pair well with a chilled glass of wine and a sunset.

I always visit John Cross Fisheries on day one of our trip. I pick up some fresh whitefish and a few smoked fillets that they smoke in the tiny shed next to the dock. I can't help myself from buying enough to eat some straight from the bone, and some more to make some home-made smoked-fish spread.
I should mention that John Cross makes some amazing whitefish spread, but here are two versions to try at home. One is more of a smooth pate, while the other is a chunkier spread that is equally delicious on toast points or bagels the following morning.

You can use a variety of smoked fish in these recipes. Smoked mackerel is one of my particular favorites, but I'll never stray from whitefish when I'm up north. Both of these recipes are really simple to pull together and add an extra elegance to a pre-dinner nibble. We've been known to forget about dinner after a few glasses of wine, so don't forget to serve it with a nice dry white or rose.

Smoked-Fish and Horseradish Pate
Adapted 101 Simple Suppers by the BBC

8oz smoked fish fillets, such as whitefish or mackerel, skinned and boned
3 tbsp freshly grated horseradish (or freshly prepared from a jar)
4 oz ricotta cheese
juice of one lemon
1 tsp fennel seeds, crushed
2 tbsp melted butter
fresh bay leaves and pink or green peppercorns to garnish
cornichon pickles, pickled onions, and toast- rye or white, to serve

In a food processor, combine all of the ingredients until smooth. Taste and add more lemon juice if necessary.

Spoon into a bowl and drizzle over the butter. You can refrigerate in order to allow the butter to harden or dig right in.

Garnish with bay leaves and peppercorns. Serve with cornichon pickles, pickled onions and toast.

Smoked-Fish Spread
Adapted from Gourmet Magazine

1 lb smoked fish such as trout, mackerel or whitefish fillets, skin and bones removed
1 sticks (1 cup) unsalted butter, softened
1/3 cup finely chopped shallot
1/4 cup finely chopped fresh dill
1 tbsp fresh lemon juice
1/2 tsp hot sauce
1/4 tsp freshly cracked black pepper
1 cup cold water

Flake the fish and transfer 2 cups of it to a food processor. Reserve remaining fish. Blend with butter, shallot, dill, lemon juice, hot sauce and pepper until smooth.

With the motor running, add water to the trout puree in a slow stream until it's absorbed- about 1 minute. Transfer to a bowl and fold in the rest of the fish.

Pack the mixture into a 4 cup glass or ceramic mold or bowl. Cover the surface with wax paper and then tightly with plastic wrap. Chill for about 6 hours to allow the flavors to develop. Bring it back to room temperature to serve.

Serve with toast points or whole wheat crackers.

6/20/10

Mr. Pickles


Last weekend, on a visit to Chicago's very own Lit Fest with my cousin, Lauren, I managed to pick up a first edition of The Complete Book of Pickles & Relishes, circa 1965. Leonard Louis Levinson dedicates the book to his mother and "the memory of our spice-scented kitchen at pickling time."

Needless to say, this is an extremely comprehensive book that covers everything from the history of pickling, 324 pages of pickles (or gherkins) relishes, and chutneys from all over the world, advice on how to show your pickles (for blue ribbons of course) and how to preserve a husband. I was particularly interested in the latter and have learned from our dear author that "even the poorest varieties can be made sweet, tender and good by garnishing them with patience, spicing them with smiles and flavoring them with kisses." Good advice to keep in mind!

I must admit that I have a serious soft spot for pickles, relishes and chutneys of all kinds. It may seem old-fashioned, but gifting something in a glass jar has never been cooler. A nice homemade chutney is the perfect gift at the holidays. I simply couldn't live without Branston pickle in the UK, served on granary bread and sharp, mature cheddar. Pickles themselves, in every variety of vegetable, are a weakness of mine. I prefer not to eat a sandwich without a crunchy and tangy pickle by its side.

There is something about the word pickle that conjures up a smile. I have a Christmas ornament in the shape of a pickle and it's my favorite to unwrap every December. Many years ago, I met a dog at a pub in London called Mr. Pickles. He was fabulous. As a small Jack Russell, he had the look of a distinguished gentleman, but his name made me giggle every time I saw him.

This recipe is certainly more of a relish or chutney than a pickle, but I think it's a perfect summer accompaniment to any grilled fish, meat or poultry. If you make enough, you'll have enough for several meals, like I did. I made these aromatic pork burgers and the spicy ginger and chili was perfect with them. I've got some local white fish in the refrigerator for tomorrow night and I'll serve them simply grilled with a dollop of the chutney on the side and some steamed asparagus. Whenever I make grilled cheese sandwiches, whether it's a fancy Gruyere and sauerkraut on dark rye or a Kraft singles version, a side of spicy chutney is a must.

This is adapted from a more modern cook book, but I would suggest before you start doing any pickling, you buy a book like the one above to ensure you understand how to sterilize jars and ultimately avoid a"pickling failure", as the author puts it. No one would want that.

Chile Tomato Chutney
Adapted from Sunny Days & Easy Living by Lindy Wildsmith
Makes 2 cups

2 dried chillies, seeds and all
2 inch piece of fresh ginger, peeled and roughly chopped
2 garlic cloves
2 shallots, peeled and roughly chopped
1/2 cup white wine vinegar
3 x 14 oz whole plum tomatoes, drained, de-seeded and chopped- reserve liquic
1 cup light brown sugar.

In a food processor, finely chop the chillies, ginger, garlic and shallots. Add the vinegar, tomatoes, and sugar into a large heavy saucepan and add the ginger mixture to it.

Bring it slowly to a boil and then simmer over low heat for about 1 1/2 hours until it's reduced by half. Stir if from time to time and if it should dry out too much, add a little of the reserved tomato liquid. Let it cool a little and then spoon it into a sterilized jar and seal it. I put it straight into the refrigerator and it's gone within a week, but it will keep for much longer if properly sealed.

Serve with grilled fish, meat, poultry or these fantastic aromatic pork burgers:


Aromatic Pork Burgers in Pita Bread
Adapted from Sunny Days & Easy Living by Lindy Wildsmith
Serves 4-6

3 slices of white bread
5 tbsp milk
1 3/4 lb ground pork
2 free range eggs
a handful of fresh parsley, finely chooped
4 garlic cloves, crushed
1 tsp ground cinnamon,small pinch of ground cloves
1 tsp ground turmeric
large pinch of ground red pepper
seeds of 4 cardamom pods, crushed
1 tsp sea salt
freshly ground black pepper
olive oil, for brushing

yogurt dressing:
1 cup plain greek yogurt
seeds of 4 cardamom pods, crushed
large pinch of sea salt

Serve with chile tomato chutney, grilled pita bread and shredded iceberg lettuce

Make the yogurt dressing by combining yogurt, crushed cardamom seeds and salt. Mix well.

Soak the bread in the milk for about 10 minutes until soft, then squeeze the bread with your ands until almost dry. In a bowl, combine the bread, ground pork, eggs, parsley, garlic, spices, salt and plenty of pepper. Mix well, but just until combined so it does not make the meat tough. Let the mix stand for 60 minutes. Shape the mix into 12 patties, cover and refrigerate until you're ready to grill.

Brush each pattie with a little olive oil and preheat a hot grill or barbecue. Grill for 20 minutes, turning from time to time to avoid burning. Make sure the burgers are cooked through, cutting into them and ensuring that they are not pink inside.

When the burgers are finished, top with a spoonful of chutney and serve with grilled pita breads filled with shredded lettuce and yogurt dressing.

6/7/10

Deja vu


I think there's something about living in a climate that is so brutally cold in the winter that makes you appreciate your springs and summers that much more. In Chicago, I never feel spoiled by the warmth, but grateful as soon as that last snow melts. This evening, I turned on the TV for tonight's evening news only to met with a certain deja vu. Randomly, severely clouded map of the UK flashed onto the screen with an ever-so-cheery weather woman droning on about the week's grim outlook. For a moment, I was back in London, thankful to be experiencing highs in the 60F range mid-summer while the rest of the country sank into the 50's range.

I'm not sure which I prefer, but living in Chicago with its extreme shifts in climate at least make for a more predictable barbecue season. I know I've droned on about barbecues in the past, but to me, there are endless possibilities when presented with hot coals.

Homemade barbecue sauce is definitely a great place to start. No matter what anyone tells you, nothing out of a jar can beat a sauce from scratch. I find most sauces from the jar are way to sweet and I like mine with certain kick. Last summer, our upstairs neighbor hand-delivered two different batches of ribs with a very special "secret sauce." The sauce was perfectly tangy and I'm planning on prying the recipe from Larry over a few glasses of wine at our summer party.

Here's a barbecue sauce you can tamper with on two levels. Firstly, choose your meat of choice: free range chicken - spatchcocked or cut into joints, or leg of lamb-on the bone, or pork ribs. Secondly, as with any barbecue sauce, you can play with the spices to get the perfect amount of kick for your taste buds. I added red chillies to mine.

I won't tell you how to barbecue all the above type meats- you can ask your favorite grill master for some tips. Start with this sauce and your more than half way there.

Homemade Barbecue Sauce
Adapted from Jamie at Home by Jamie Oliver

1 heaped tsp cumin seeds
2 tbsp fennel seeds
5 cloves
2 red chillies, seeded and minced,
sea salt and freshly ground black pepper
a bunch of fresh thyme, leaves picked and chopped
a bunch of fresh rosemary, leaves picked and chopped, a few sprigs reserved
zest and juice of 1 large orange
1 bulb of garlic, broken into cloves and peeled and finely chopped
4 heaped tsp sweet smoked paprika
3/4 cup tomato ketchup
8 tbsp olive oil
10 bay leaves

Grind the cumin seeds, fennel seeds and cloves in a pestle and mortar with some salt and pepper. Combine the chopped thyme leaves, rosemary leaves, chillies, garlic, orange zest and orange juice. Mix with the spices and add the rest of the ingredients. Stir together and leave over night, if possible, in your refrigerator. Rub your chosen meat all over with the marinade and place in a snug fitting dish. Again, leave it covered, in the refrigerator and overnight if possible.

You can bake your meat first and then finish it off over hot coals. This prevents any issue of asking each other over and over again, "do you think it's done yet??" and any potential food poisoning.

Good luck and get grilling!

5/31/10

Officially picnic weather


It's officially picnic weather. When it's warm and the air is filled with the sweet smell of fresh cut grass, it's time to take to your favorite picnic spot. Here in Chicago, there are plenty of grassy spots near the beach to roll out an old blanket and avoid sand in your food. In London, we spent a lot of time hanging out, and occasionally picnicking, in the expansive parks and gardens dotted around the city. Locally, Clissold Park was a daily occurrence for dog walks and a general soaking-in of good weather.

Hampstead Heath was probably my favorite in all seasons. Whether we were walking the dog on an early Saturday morning, biking up arduous hills, or stomping through the snow on a crisp New Year's morning, it never ceased to amaze me how quickly I forgot I was in the middle of London.

I am hugely fond of a picnic that involves wine and a full spread, but I've found packable desserts to be a challenge and tend to go for some simple fresh fruit.

This loaf cake is perfect for a picnic and would go nicely with some fresh strawberries or other seasonal fruit. The combination of pineapple and thyme make for a refreshing change in a otherwise simple loaf cake recipe. If you're English, this is screaming out for a thermos of tea to finish off a lovely picnic.


Pineapple and Thyme Loaf Cake
Adapted from Sunny Days & Easy Living by Lindy Wildsmith

10 tbsp unsalted butter, room temperature
3/4 cup granulated sugar
3 beaten free range eggs
1/2 cup self-raising flour
1/2 cup semolina
2 tsp baking powder
8 oz can pineapple chunks, chopped in a food processor
1 tbsp finely chopped fresh thyme (lemon thyme would be nice too)
1 tbsp vanilla extract
confectioners' sugar to dust on the top
loaf pan, lined with wax paper

Preheat the oven to 375 F. Combine the butter and sugar in a large mixing bowl and beat until light and fluffy. Add the eggs one a a time and beat well after each. Fold in the remaining flour, semolina, baking powder, pineapple, thyme and vanilla extract.

Bake for 30 minutes or until well risen and golden. Let it cool until you can handle it and turn it out onto a rack to let it cool thoroughly. Dust it with confectioners' sugar. Don't worry if it falls slightly in the middle. Pack it in aluminum foil or an appropriately sized tin for a fantastic picnic!

5/19/10

New Mom rescue sack

Earlier this week, I spent the evening with my friend, Karyn, who is in the midst of moving. "Ohhh, moving is stressful!" I hear you say. It sure is. My move from London nearly killed me. In fact, I can count the wrinkles on my face that were added by that move. The paperwork, the thought of all our "stuff" on a boat just waiting to sink to the bottom of the Atlantic, and the fact that I lived in an empty house with only camping chairs was enough to age me.

All of this seems like an over-reaction considering my friend also has an 8 week old baby. Baby Davis is a tiny super-cute munchkin who goo-goo'd and ga-ga'd me until my heart melted. Karyn is an uber-cool new Mom and she seemed perfectly relaxed and unfazed by the fact that very little seemed to be packed with only two weeks to go. That, in a nut-shell, is why I love this chick.

Yes- those are "Vans" socks he's wearing.

I decided a dinner delivery was in order. Who has time to mess around with food in that situation?? I arrived to the smell of sweet fig candles and a perfectly clean kitchen complete with a fully loaded baby bottle tree. Loaded in my "New Mom rescue sack" was a big tub of Orzo, fresh Caprese focaccia from the local market, and most importantly: wine.

I just started working a block from the French Market here in Chicago and I love it for many reasons. Saigon Sisters is certainly tops, but I adore the Pappardelle's Pasta stand with its flavorful handcrafted gourmet pastas. Other flavored pasta I've tried in the past have come out of the boiling water with the taste left behind. Gladly, this is not the case with Pappardelle's.

You can easily make this with plain Orzo found in any super-market. I like adding some simple flavor layers along the way, careful not to over power the pasta, but enough to add interest. Pappardelle's Pasta has a website with recipes to try, and there are plenty ideas for inspiration. You can add veggies that happen to be in season, which is why I never end up making the same way twice.

You can also add roasted chicken or shrimp for a heartier meal. For the tomatoes, you can use chopped fresh tomatoes, sun-dried tomatoes or oven-roasted (also known as sun-blushed tomatoes in the UK.) I prefer fresh or oven-roasted/sun-blushed instead of sun-dried. I find them too bitter and strong.

This dish is great at room temperature or cold, which is why it's perfect for a picnic or when you're doing dinner delivery.

Orzo with Seasonal Vegetables, Feta and Arugula
Serves 4

1 lb Orzo
3/4 cup oven-roasted tomatoes
2 tbsp oil from the tomatoes or use regular extra-virgin olive oil
2 tbsp fresh oregano, finely chopped
juice of 1 lemon
1 tsp lemon zest
1/2 cup pitted Kalamata olives
1 bunch of asparagus, grilled or roasted and cut into bite size pieces
4 oz feta cheese, crumbled
1 large handful of arugula (known as rocket in the UK) keeping some aside for garnish
salt and freshly ground black pepper
dash of balsamic vinegar to finish

Grill the asparagus in a grill pan until cooked through. Set aside and chop into bite size pieces. Cook the pasta in rapidly boiling salted water until al dente (about 8-10 minutes).

Meanwhile, combine the tomatoes, oregano, olives, salt, pepper, oil from the tomatoes, lemon juice, lemon zest, asparagus and toss (everything but arugula).

Drain the pasta and to the mix and toss again. At this point, if you're going to be taking the pasta with you, put it in an air-tight container and wait to add the feta and the arugula until you're ready to serve.

To serve, toss the pasta with the crumbled feta and the arugula. Check the seasoning.

Spoon onto plates, garnish with extra arugula and a dash of balsamic vinegar.

Serve with some nice bread and a glass of wine.

5/9/10

Cinco de Tostada


As I rode past one of my favorite Mexican restaurants on Cinco de Mayo, I noticed the patio was heaving, and intoxicating smells were wafting towards me. With no reservations, my chances of getting even a few chips and salsa were slim. Luckily, my friend Jen, who had just been to Chicago for dinner a couple of weeks back, had sent me her favorite spicy Mexican shredded pork (Tinga) recipe from Cook's Illustrated. As a huge fan of Rick Bayless (you can try his recipe as well), she swears by it and claimed it's similar to Rick's.

Any time I use a recipe from Cook's Illustrated, apart from the fact that my cousin Becky is a chef on America's Test Kitchen, I know the recipes and ingredients are tried and true. For example, when making tostadas, you can either fry them or bake them, but they urge you to buy a corn tortilla with no preservatives with ingredients made up only of corn, lime and salt.

I did use the traditional method of frying the tostadas, but a few splatters of hot oil burns on my arm will probably lead me to the baking method in the future (and the fact that it means less oil used).

I do wish that I had this recipe when I was living in London. The lack of authentic Mexican food seriously depressed me. Good jarred salsa was difficult to come by. I learned to make a good roasted chile salsa, a lovely chicken tortilla soup, and a mean batch of guacamole, but these tostadas would have seriously pepped me up.

The chipotle powder can be substituted with a 2 minced canned chipotles, but Cook's Illustrated swears by the powder. I used pasilla chile powder from Dean & Deluca (which you can order) as it was part of a Mexican spice set I had in my pantry. It also included Mexican oregano, which I used here, so keep that in mind as well.

I made enough pork for 4-6 people so that the two of us had some leftovers. You can use them in burritos or tacos, or serve it re-heated, like I did, with some Mexican rice and a cold beer.

Spicy Mexican Shredded Pork (Tinga) Tostadas
Adapted from Cook's Illustrated
Serves 4-6

2 lbs of boneless pork butt, cut into 1 inch cubes (trimmed of fat, it should be 1 1/2 lbs)
2 medium onions, one quartered, one chopped fine
5 medium garlic cloves, three peeled and smashed and two minced
4 sprigs fresh thyme
salt
2 tbsp olive oil
1/2 oregano
1 x 14.5 oz can tomato sauce (plain - I used passata)
1 tbsp chipotle powder
2 fresh bay leaves

For the tostadas:
12 x 6 inch corn tortillas
3/4 cup of vegetable oil (if using the frying method)
4 tbsp of vegetable oil (if baking)

For garnish:
diced avocado
lime wedges
queso fresco or feta cheese, crumbled
sour cream
diced tomatoes and onions

Bring the pork, the quartered onion, 6 cups of water, smashed garlic cloves, thyme and 1 tsp of salt to a rapid simmer and then turn down to a low- simmer. Cook for 75-90 minutes until the pork is tender, skimming off any foam that rises to the surface.

Reserving 1 cup of cooking liquid, drain the pork and discard the onion, garlic and thyme. Return to the pan and using a potato masher, mash until shredded into 1/2 inch pieces.

Heat the olive oil in a non-stick skillet and heat until shimmering. Add the pork, chopped onion and oregano. Turn often and cook for about 7- 10 minutes until the pork is well browned.

Make a well in the middle of the mixture and add the minced garlic for about 30 seconds and then add the tomato sauce, chipotle powder, reserved cooking liquid and bay leaves.

Leave to simmer until most of the liquid disappears, about 5-7 minutes. Remove and discard the bay leaves and season with salt to taste.

Prepare your tostadas by either frying them (traditional method) or baking (better for you method.) Both have a similar outcome, so I would recommend baking.

Frying: Heat vegetable oil in frying pan until 350 degrees. Poke each of your tortillas in the center with a fork 3-4 times to prevent puffing and to allow them to cook evenly on both sides.

Add the tortillas (one at a time) to the oil and use the potato masher to hold them down. They should take about 45-40 seconds each (no need for turning) and then you can drain them on a plate with paper towels. Repeat until all are cooked.

Baking: Preheat your oven to 450F. Place each tortilla in a single layer on two rimmed baking sheets. Brush both sides with a little vegetable oil and place a wire rack up-side down on top of the tortillas to keep them flat.

Bake for 15-18 minutes on the upper and lower-middle racks of your oven, switching them half way through the baking process. Tortillas should be golden brown and crisp, ready to top with your tinga and garnishes.

5/1/10

Berry delicious


Baking only ever occurs in my house on the weekends unless a cake must be baked for a special occasion. This morning, I found myself with a surplus of blackberries. I had bought a ton of them for a smoothie-making marathon that occurred this week in celebration of a new blender. For those of you who have read in the past, you'll know that many of my appliances are still lurking in the shadows of my pantry with English plugs. The red kitchen-aid blender remains useless.

I finally broke down and bought a blender so that healthy glasses of yogurt and berries can be drunk. After returning from dinner one night this week with colleagues, I found Martin had made a smoothie for dinner. He decided his dinner-smoothie needed a little extra "something" and added Jack Daniels. Needless to say, this is not what I had in mind for our health kick.

If blackberries were made for anything, then this coconut blackberry slice is it. Serve it as you would cookies- for an afternoon snack with milk or coffee. If you've never checked out any of Bill Granger's recipes, I urge you to do so. They are each filled with Australian sunshine and goodness.

You can adapt this to any number of fruit combinations depending on the season.

Coconut Blackberry Slice
Adapted from Bills Food by Bill Granger
Makes 20

For the base:
4 1/2 oz unsalted butter at room temperature
1/4 cup caster sugar
1 free-range egg
1 tsp vanilla extract (the good stuff)
1 1/2 cups plain, all-purpose flour
1 tsp baking powder
1/4 cup of milk

For the filling:
1/2 cup blackberry jam
1 cup blackberries

For the topping:
3 1/2 oz unsalted butter
5 tbs caster sugar
2 free-range eggs
2 1/2 cups desiccated coconut
1/2 cup plain, all-purpose flour

Preheat your oven to 180C or 350F. Grease and line with parchment paper a 12x8 inch baking tin.

To make the base, cream the butter and sugar until light and fluffy. Add egg and vanilla extract and stir to combine. Sift the flour and baking powder together and add to the mixture with the milk. Flour your hands and press this into the tin. Top evenly with the jam and then the blackberries.

For the topping, cream the flour and sugar together until fluffy, add the eggs and beat until combined. Stir in the coconut and 1 tbsp of the sifted flour and stir to combine, then stir in the remaining sifted flour. Spread the topping over the blackberries.

Bake for 30 minutes until golden. Cover with foil and cook another 5 minutes. Let it cool for 10 minutes and then cut into rectangles. Makes about 20.

4/25/10

Bacon and eggs salad


Woah! New jobs sure do take up a lot of time and energy. Over the past few weeks, I have been lucky to make it past 9:30 pm before snoring ensues on the couch. Clearly, this is not how I like to live my life and I'm happy to say after week three at said sweet new job, I am back to normal energy levels and ready to blog.

When life gets busy, I tend to stick to some basic recipes. I am thrilled if I achieve a nice bruschetta or a tasty salad for supper. When I barely have time to wolf down a bowl of cereal in the morning, my meal planning for dinners has definitely gone to pot. Here is an easy week-night supper salad, and truth be told, has more to do with bacon and eggs than it does a healthy salad.

Salad Lyonnaise, although famous and rather popular, only recently made it into my week-night salad line up. After dining with our friends at Le Bouchon here in Chicago, I decided this was a salad I could easily serve my husband without him asking "what's next?"

Make sure the bacon you're buying is the very best, and thick! Get a slab of bacon if you can and dice it yourself or get some thick un-smoked slices from the butcher.

I used some day-old french baguette to make the croutons, but use ciabatta if you have it around. The secret to this salad is the hot, vinegary dressing made with shallots. Okay, there is a second secret: any salad with a poached egg quivering on top ready to ooze its soft center into the warm dressing is heaven on earth.

Salad Lyonnaise
Adapted from Gourmet Magazine
Serves 2

1 large bunch of frisee salad leaves
4 thick slices of un-smoked bacon, cubed
1/2 french baguette, cubed
1 shallot, finely chopped
2 free-range eggs- make sure they are fresh!
3 tbs red wine vinegar
1 tsp rice wine vinegar (for the poached eggs)
1 tsp dijon mustard
salt and pepper

Firstly, make your croutons by grilling your cubed bread on a grill pan over medium heat until crisp and hot. Remove from the heat and set aside, but leave them on the pan so they are still warm when serving. You can bake these in the oven if you prefer, but the grill pan is easier for me.

While the croutons are cooking, get a shallow pan of water boiling on the stove top for the eggs.
Also pull out a slotted spoon for poaching once the water is boiled. Have ready the rice wine vinegar.

Fry your cubed bacon until crisp and golden (in a dry pan- they have enough fat that will render as you cook) and remove with a slotted spoon onto kitchen paper to drain away excess grease. Your pan will still have your bacon drippings to which you will add the chopped shallots and fry gently until tender over medium heat for about 1 minute. Add the red wine vinegar and bring to a boil, then take it off the heat.

If you're like me, you will need to pay full attention to the poaching of eggs. I prefer to have everything ready to go before I begin poaching so up to this point, the salad is ready to construct once the eggs are perfect. I have poached eggs many ways, but I think that Elise Bauer of Simply Recipes does it best: follow her instructions to poach an egg and you can't go wrong.

Prepare your salad plates with a big pile of the frisee salad leaves. Sprinkle over the bacon and croutons and season to taste. Place your poached egg on top of the leaves and drizzle with the hot dressing. Dig in!!
Powered By Blogger